To upload new files in the file explorer, follow the steps below:
Select a folder in the tree. You can also select the root folder (which has the same name as the workroom).
Upload a file to the currently selected folder in the following ways:
Via context menu: Right-click the folder to open its context menu and click the "Upload file" menu entry.
Via featured action: Click the "Upload file" action in the action area on the right side of the page.
Via magic menu: Click the magic button in the action area to open the magic menu and click the "Upload file" action in the magic menu.
Your system's file chooser dialog opens.
Select one or multiple files and confirm your choice.
The dialog closes and the chosen files are uploaded to the selected folder.
It may take a few minutes for the file previews to appear. While the previews are generated, you will see placeholder images in the content area.
You can upload a new file to a workroom and attach it to a task at the same time. You can upload a file from your local file system, or add them from CELUM Content.
People with a visitor role can only upload and attach files to a task from a computer. The file can only be uploaded to the root folder of the workroom.
Go to the taskboard and open the detail view for a task.
In the task details, click the "Attach files" button.
A pop-up menu opens:
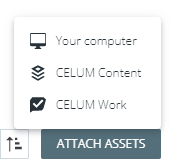
To attach new files that are not part of the workroom yet, choose one of the following menu entries:
Your computer:
Your computer's file chooser window opens.
Select some files and click "Open".
CELUM Content:
To use this functionality, your organization must also have a subscription for CELUM Content.
The "Add assets from CELUM Content" dialog opens.
On the left side of the dialog, browse through collections to see all assets inside.
Alternatively, you can activate the option "Show content of child collections" to show all assets on any level under the currently selected collection or collection type.
Select one or multiple assets on the right side of the dialog.
Use the search bar in the upper right corner of the dialog to search for assets inside the currently selected collection or structure.
Click the ![]() Add button.
Add button.
A "Select folder for upload" dialog opens. There, select a folder for upload or create a new one.
Click on "Upload and attach" to finish.
Files added from CELUM Content
will have an "CELUM Content"
![]() symbol in the lower right corner. If the
asset is deleted in CELUM Content,
the symbol on the file will be grayed out and the status will be "No longer available in CELUM Content".
symbol in the lower right corner. If the
asset is deleted in CELUM Content,
the symbol on the file will be grayed out and the status will be "No longer available in CELUM Content".
Alternative way to upload
You can also simply drag and drop files from your local file system onto the task details.
If you have subscribed to a workroom with CELUM Drive, then you can directly upload new files from your file system by copying them into the workroom folder in your local system. These new files will automatically be synchronized to the workroom.