This action is only possible for people with manager or contributor role.
If a task list owner robot is set for the current list, then only task list owners may be able to perform the described actions.
Create subtasks to divide your complex tasks into smaller, manageable units. Dividing your tasks in this way gives structure to your work that is easy to track – even at a glance.
In task details, navigate to the "Subtasks" section. By default, this section is expanded.
Click on the "Create subtasks"
![]() icon. A text area appears.
icon. A text area appears.
In the text area, enter the name of the subtask and click outside the text input area to save it.
The subtask is created and added to the top of the list.
You can drag and drop the subtask to change its position.
The following actions are possible on subtasks:
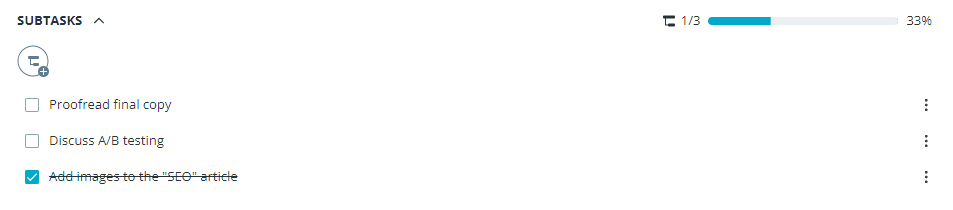
Mark a subtask as complete by clicking on the inactive checkbox. The subtask name will be crossed out. When all subtasks are completed, the checkboxes will turn green.
Reopen a subtask by clicking on the active checkbox. The subtask name will no longer be crossed out.
Assign a subtask
to one or more people by clicking on the "Add assignees"
![]() icon and follow
the steps.
icon and follow
the steps.
If the person is not yet invited to the Workroom, as a manager you can also invite them and assign in the pop-up menu.
Edit subtask
name by clicking on the "Edit" icon ![]() . You can also edit a subtask that is marked
as complete.
. You can also edit a subtask that is marked
as complete.
Convert
subtask
to a task by clicking the "Convert to task" option
in the "More actions" menu.

Drag and drop subtasks to change their position in the list.
Delete a subtask
by clicking "Delete" option in the "More actions"
menu.

Via the progress bar, you can visually track the completion state of subtasks:

Progress bar shows completion and turns green when all subtasks are completed.
The subtask completion is additionally shown in percentages next to the progress bar.