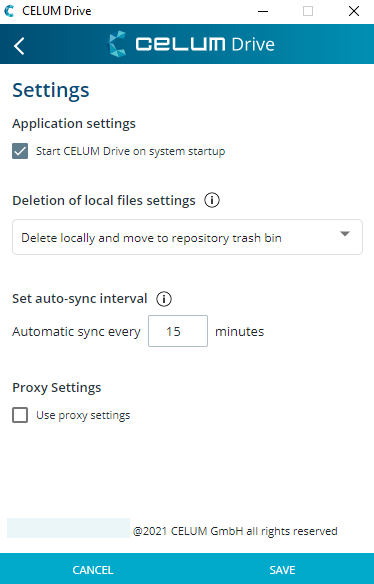
You can edit your CELUM Drive desktop app
settings in the app menu ![]() in the title bar.
Just click the "Settings" menu entry and the settings
open in a new overlay. To apply the selected settings, click the
"Save" button.
in the title bar.
Just click the "Settings" menu entry and the settings
open in a new overlay. To apply the selected settings, click the
"Save" button.
You can edit your CELUM Drive desktop app
settings in the app menu |
|
The check box "Start CELUM Drive on system startup" in the "Application settings" section lets you decide whether CELUM Drive desktop app should be started automatically when you start up your computer.
Starting it automatically is useful because you can then immediately start synchronising.
By default, the Drive sync is set to automatic syncing at 10-minute intervals. However, you can adjust the sync intervals yourself by entering your preferred sync interval in minutes.
The minimum sync interval is 1 minute and maximum 60 minutes.
In the section "Deletion of local assets settings", you can select between 2 outcomes that should happen if you locally delete a synced asset:
Delete the asset locally and create a tracking conflict.
Delete the asset locally and move to repository trash bin (default).
If the repository doesn't have a trash bin configured, the asset will be deleted permanently immediately if you chose this option.
In both outcomes, the deleted asset can be restored either by re-downloading it when resolving the conflict or restoring it from the trash bin or deleted permanently if the "Delete online" option when resolving a conflict is selected and the asset is deleted from the repository trash bin.
If your company uses a proxy setup, you must set the proxy settings in the "Proxy Settings" section to allow CELUM Drive to work properly.
If your organisation's firewall filters inbound our outbound traffic, your IT department needs to adapt the filter rules. See the section "Additional settings for traffic filtering" for more information.
The following image shows the complete process for setting up CELUM Drive proxy settings from a technical perspective:

Enable or disable proxy settings with the check box "Use proxy settings".
Enter your proxy server's host and port.
Choose a proxy type via the drop-down menu "Type".
Enter your user name and password for the proxy server.
Optionally define one or more domains that should ignore the proxy settings in the bypass list.
Separate entries with semi-colon (;).
If both the repository server (e.g. your CELUM Content server) and external connections are only available through the proxy server, leave the field empty.
If external connections are only available through the proxy server but the repository server is available without it, add the local repository server's domain (e.g. contenthub.yourcompany.local) to the field to bypass it.
If the repository
server is only available through the proxy server but external
connections are available without it, then specify at least
the following domains with the standard TCP port 443 in the
field to bypass them:
*.celum.com:443;*.blob.core.windows.net:443;*.b2clogin.com:443
Quit CELUM Drive
completely (not just closing
the application window, but quit it via the system tray icon ![]() ) and restart it. This is necessary for the changed
proxy settings to be applied properly.
) and restart it. This is necessary for the changed
proxy settings to be applied properly.
These settings need to be set by your organisation's technical system administrator in order to allow the CELUM Cloud URLs.
If your organisation's firewall filters inbound or outbound traffic, the following URLs need to be accepted in the filter rules:
CELUM service to be allowed |
Outbound |
Inbound |
| CELUM Drive App |
|
None |