Nowadays, a lot of content is released by publishing it to a range of diverse media platforms. Normally, content has to be updated or deleted on these media platforms manually. With CELUM Content's "Backstage" module, you can fully automate the process of publishing, updating, and removing CELUM Content assets on media platforms.
You can access the Backstage module in a dedicated main view tab. By default, the tab is called "Backstage", but it may have a different name on your CELUM Content server. With Backstage, you can publish assets and their metadata to different media platforms, which are called "Stages" in the context of this documentation.
The available Stages depend on CELUM Content Backstage extensions, which must be deployed on your CELUM Content server. If no Backstage extensions are deployed, you can still see the "Backstage" main view tab, but you cannot publish assets to any Stages.
For every Stage (media platform), you create one or multiple "Stage Handlers", which define the set of assets ("scope") and the metadata which gets published to the Stage at a time. For every Stage Handler, you can decide when and for how long the included assets should be published. You can also update the assets within a Stage Handler automatically on the Stage when they are changed in CELUM Content (e.g. if a new version is uploaded).
If you often publish Stage Handlers with the same properties (e.g. the same assets with different metadata or different assets to the same Stage account), you can use a "Stage Handler Master" as a template to set up multiple Stage Handlers with the same properties. The Stage Handler Master acts as a template for Stage Handlers, which can inherit properties from the Stage Handler Master.

The Backstage main view tab has the same layout
as other main view tabs.
However, instead of the navigation tree,
the left side contains a list of all available
Stages and
existing Stage Handler Masters
for each Stage.
You can identify the Stage Handler Masters
by their icon ![]() . The
right side contains two tabs:
. The
right side contains two tabs:
Stage Handler: A list of available
Stage Handlers
within a selected Stage Handler Master
or within the selected Stage.
You can identify Stage Handlers
by their ![]() icon.
icon.
Settings: The configuration area for a selected Stage Handler or Stage Handler Master.
Normally, you start by creating a Stage Handler Master for a fresh Stage:
Click on the "New" button in the active menu. A dialog opens and you can choose the Stage which you want to create the handler for.
Click "Create new Stage Handler Master" to create a new Stage Handler Master.
Alternatively, you can choose an existing Stage Handler Master to immediately create a new Stage Handler in it.
The "Settings" tab now shows a lot of fields to configure the Stage Handler Master. Required fields are marked by an asterisk (*). You can leave optional fields empty for now and fill them later for each individual Stage Handler. The first field set is independent of the Stage and always contains the same fields:
Name: Enter the name of the Stage Handler Master
Description: Enter an optional description.
Trigger: Choose the publishing method for the Stage Handlers inside the Stage Handler Master. You can choose between manual or repeated automatic publishing.
All other fields in the Stage Handler Master depend on the currently chosen Stage. Most fields have various input modes which allow you to connect field values to asset metadata.
Click "Save changes" to finish the configuration process. You can always change the Stage Handler Master's settings later.
After you saved the Stage Handler Master, you can choose to immediately create a Stage Handler in the master. Click "Yes" if you want to proceed.
| Button | Name | Function |
|
Inherited from Stage Handler Master |
This option is available in the Stage Handler configuration. Select this option to transfer the values or mappings of a field from the Stage Handler Master to the Stage Handler. |
|
User input |
This option is available in the Stage Handler Master and Stage Handler configuration. Select this option to manually enter data into a field. |
|
Linked to Metadata |
This option is available in the Stage Handler Master and Stage Handler configuration. Select this option to link a field's value to an asset's information field value. |
|
Linked to file property |
This option is available in the Stage Handler Master and Stage Handler configuration. Select this option to link a field's value to file properties that have been retrieved for an asset in the system. |
Click on the "New" button in the active menu. A dialog opens and you can choose the Stage which you want to create the handler for.
Choose an existing Stage Handler Master which you want to create the Stage Handler in.
The "Settings" tab now shows a lot of fields to configure the Stage Handler. Required fields are marked by an asterisk (*). The first field set is independent of the Stage and always contains the same fields:
Name: Enter the name of the Stage Handler.
Trigger: Choose the publishing method for the Stage Handler. You can choose between manual or repeated automatic publishing.
Scope: Choose the parent nodes whose assets you want to publish. You can add multiple nodes of different types.
Recursive: Check this box to publish all assets underneath the chosen nodes' structure, i.e. also assets in sub-nodes.
All other fields in the Stage Handler depend on the currently chosen Stage. Most fields have various input modes which allow you to connect field values to asset metadata.
Save the changes. We also recommend that you test the connection to the Stage (e.g. the YouTube account used) with the "Test connection" button.
Next, you can start publishing the Stage Handler.
| Button | Name | Function |
|
Inherited from Stage Handler Master |
This option is available in the Stage Handler configuration. Select this option to transfer the values or mappings of a field from the Stage Handler Master to the Stage Handler. |
|
User input |
This option is available in the Stage Handler Master and Stage Handler configuration. Select this option to manually enter data into a field. |
|
Linked to Metadata |
This option is available in the Stage Handler Master and Stage Handler configuration. Select this option to link a field's value to an asset's information field value. |
|
Linked to file property |
This option is available in the Stage Handler Master and Stage Handler configuration. Select this option to link a field's value to file properties that have been retrieved for an asset in the system. |
Select a Stage Handler Master and subsequently a Stage Handler in the "Stage Handler" tab. You can then synchronize a Stage Handler from the list in order to publish or remove its assets:
Automatically run all Stage Handlers within the selected Stage Handler Master with the "Sync all now" button. It depends on each handler's current status if the assets are uploaded to or removed from the Stage.
Double-click a Stage Handler
to open it and run it manually or schedule
its publication. This opens the Stage Handler's
overview. The overview shows the Stage Handler's name
and information, as well as all included assets
and their status:
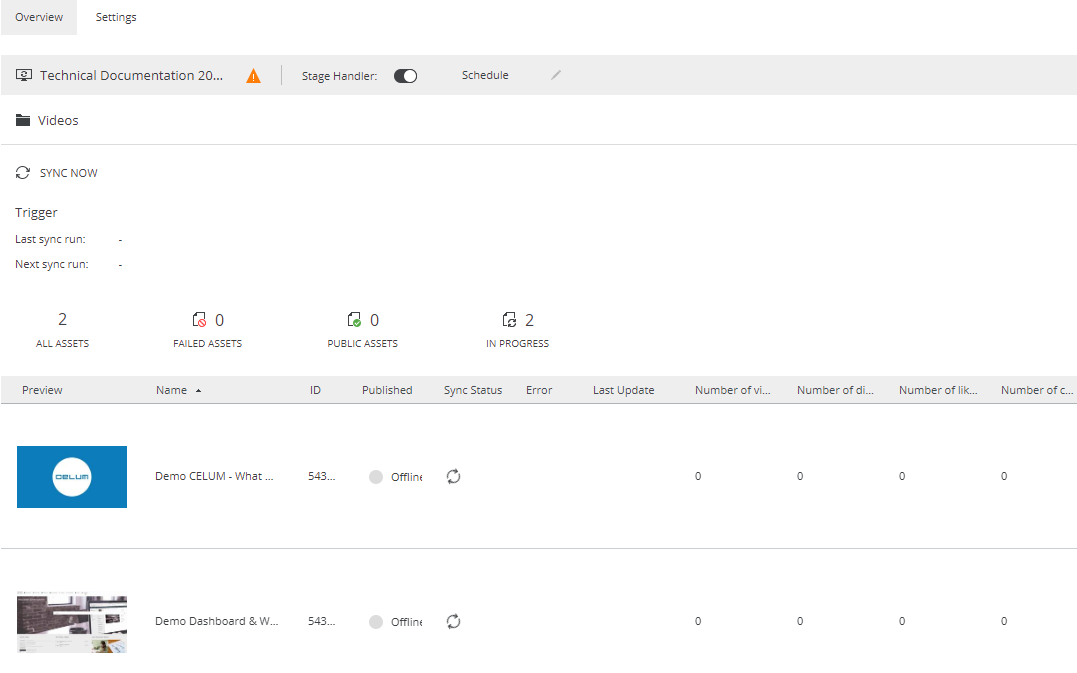
To publish or update a Stage Handler
and all its assets,
turn the "Stage Handler" toggle button in the handler's
title bar to the "on" position ![]() and click the "Sync now" button. The assets
are uploaded to the Stage.
and click the "Sync now" button. The assets
are uploaded to the Stage.
To withdraw a Stage Handler
from publication, turn the "Stage Handler" toggle button
back to the "off" position ![]() and click the "Sync now" button again. The assets are removed from
the Stage.
and click the "Sync now" button again. The assets are removed from
the Stage.
To cancel a Stage Handler's synchronization, click "Cancel".
During each synchronization (either publication or removal of the assets), the Stage Handler's title bar shows the synchronization status of the handler and the asset list shows the synchronization status for each asset:
| Icon | Meaning |
|
Shown for each asset in the "Sync Status" column if the publication or removal of the asset was not successful. In this case, an error message is also displayed in the "Error" column. Shown in the Stage Handler's title bar if the whole handler's synchronization could not be triggered, probably due to a configuration error in the settings. |
|
Shown for each asset in the "Sync Status" column if the publication or removal of the asset was successful. Shown in the Stage Handler's title bar if the whole handler was synchronized successfully (no errors occurred and all assets are synchronized). |
|
Shown in the Stage Handler's title bar if the handler was synchronized, but at least one asset was not synchronized successfully. |
|
Shown in the Stage Handler's title bar directly after you triggered the synchronization. The synchronization is queued but has not started yet. |
|
Shown for each asset in the "Sync Status" column while the publication or removal of the asset is running. Shown in the Stage Handler's title bar during synchronization of the handler. |
|
Shown in the Stage Handler's title bar if the synchronization was cancelled. |
|
Shown for each asset in the "Published" column if the asset was successfully published to the Stage. |
|
Shown for each asset in the "Published" column if the asset was successfully removed from the Stage. |
You can either enter a publication schedule whenever you turn a
the "Stage Handler" toggle button of a Stage Handler
"on" ![]() ,
or before any subsequent synchronizations with the "Schedule"
button in the Stage Handler's
title bar.
,
or before any subsequent synchronizations with the "Schedule"
button in the Stage Handler's
title bar.
Whenever you turn a Stage Handler's "Stage Handler" button on or click the "Schedule" button, a dialog appears. Check the "Publication schedule" box in the dialog and choose a start and end date and time. During the chosen time period, the Stage Handler's assets will be published on the Stage. They will then be removed and the Stage Handler will be taken offline. You can choose just a start date, which means the assets will be published indefinitely (or until you take the handler offline) after that date, or just an end date, which means the assets will be published immediately, but taken offline automatically at the end date.
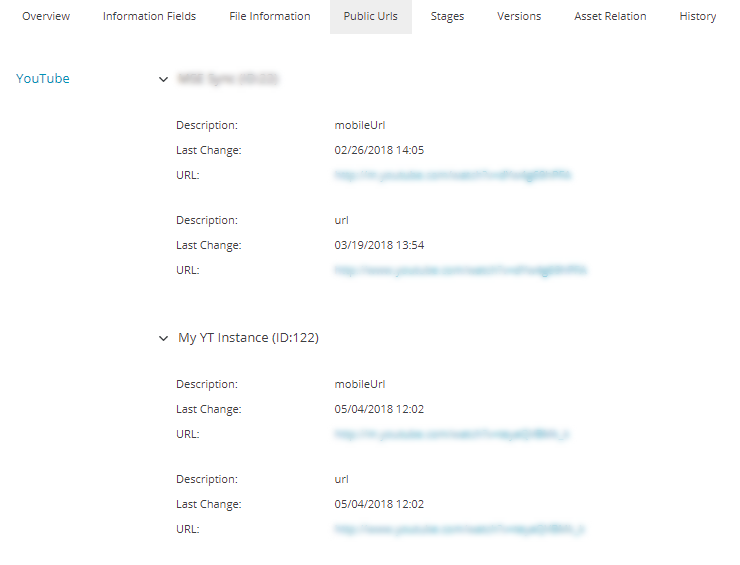
Outside of the "Backstage" main view tab, you can also see an asset's publication status (online or offline) in the asset's detail view when you navigate to the asset.
|
The "Public URLs" detail view
tab shows you all public references of the selected asset.
Public URLs are created by all CELUM Backstage
connectors (MovingImage, MS Azure, Webserver and YouTube connector) as
well as some other CELUM Content
product extensions. Public URLs provide direct links to assets on distribution
and media platforms like public web servers, Backstage
Stages, or CDNs.
Click on a public URL to open the link in a new browser tab.
|
|
The "Stages" detail view tab shows you a list of each Stage Handler which the selected asset is published with. For each Stage Handler, you can see if the asset is online or offline and if the last synchronization was successful or has failed. You can open the public URL or jump directly to the Backstage main view tab. Click "More details" to see statistics about the asset on the Stage.
|
Concrete stage handler information
The following articles provide stage-specific information for the stage handler creation process: