With CELUM Content's PIN and Smart Views functionalities, you can share selected content for a specific period of time with other people who do not have access to CELUM Content. This ensures that the people you make content available to can ONLY download the content you want them to have, when you want them to have it.
They are also adaptable, which means any changes in a node's content are also reflected for the recipients of a PIN-Link or a Smart View on that node. This allows you to create a PIN-Link or a Smart View directly after creation of a node and decide later which assets should be assigned to the node and shared with the recipients.
You need the local permission "Manage own PIN" on the selected content, otherwise you won't be able to use the PIN-Link function.
Switch to the second tab ("Existing PIN-Links").
The second tab in the "Share" dialog shows you
all existing PIN-Links
for the selected node. You can send each link via e-mail with
![]() or copy it to the clipboard with
or copy it to the clipboard with ![]() .
.
Permissions necessary for seeing others' PIN-Links
If you don't have the global permission "Administer PINs from other users", you can only see your own PIN-Links, not links created by other users.
Recipients of the PIN-Link can open the link in a browser, which opens the PIN landing page. On the landing page, recipients can choose from the available download formats for each asset to directly download each asset to their local file system. Alternatively, they can download all assets contained in the PIN-Link with one click or filter the available assets by their file type to download only assets of a specific type.
If they choose to download all or multiple assets, a ZIP file is created which is subsequently downloaded.
If the sent PIN-Link is invalid or unavailable, recipients will see an according error message instead of the included assets.
PIN availability is tied to the creator's permissions and status
Under the following circumstances, a PIN-Link will no longer be valid:
The object(s) that the PIN-Link was created on were deleted
The PIN-Link's creator user is no longer allowed to see the node where the PIN-Link was created
The PIN-Link's creator user was deactivated or deleted
In these cases, recipients won't be able to download the PIN-Link's content anymore.
Switch to the third tab ("New PIN-Link").
Enter a name for the PIN-Link.
Optionally choose additional download formats which should be available.
Send the PIN-Link via e-mail or copy it to the clipboard.
The PIN-Link is automatically saved when you close the dialog.
Want to customize or edit a PIN-Link? Check how to create an advanced PIN-Link instead.
If a basic PIN-Link is not enough, you can either edit existing or create new PIN-Links with additional properties in the "Manage PIN-Codes" dialog.
Open the dialog with one of the following options:
Open the "Share" dialog on a node and click
the ![]() icon next to
an existing PIN-Link
in the "Existing PIN-Links"
tab.
icon next to
an existing PIN-Link
in the "Existing PIN-Links"
tab.
Open the "Share" dialog on a node and click
the "![]() Edit PIN" button in the "New PIN-Link"
tab.
Edit PIN" button in the "New PIN-Link"
tab.
Open the context menu on a node and choose the "Manage PIN-Code(s)" menu entry.
Open the sidebar on a node with existing PIN-Links. In the sidebar "PIN Codes" section, you can view and edit each active PIN-Link.
The "Manage PIN-Codes" dialog looks as follows:
On the top left side of the dialog, you will see a list of existing PIN-Links which you can select. If no PINs are available yet, you will see the text "No PIN-Codes" available". On the bottom left side of the dialog, you can either create a new or delete an existing PIN-Link. On the right side of the dialog, the configuration options for the selected PIN-Link are listed. You can easily switch between the sections with the tabs at the top of the dialog. To share a selected PIN-Link, click "Share" in the top right corner. |
|
Configure the link with the following advanced settings:
Name: Enter a name for the PIN-Link.
PIN-Code: Set the unique identifier
for the PIN-Link.
You can either generate the PIN-Code automatically with the
![]() button or manually
enter a code.
button or manually
enter a code.
Validity: Set the time period in which the PIN-Link is valid, i.e. in which recipients can download the content associated with it.
Information for the recipient: Enter information which is displayed to the recipient on the PIN-Link landing page. You can enter the information in all available UI languages.
Confirm reading: The recipients must check a box on the landing page that they have read the information.
Scroll down to the "Download Formats" section and choose one or multiple download formats for the content in the PIN, which determine the quality and size of the downloaded assets. Keep in mind that not every associated acontent can be downloaded in every chosen download format.
Other people can only download a PIN if the PIN has at least one download format assigned.
Scroll down to the "People"
section and choose users or user groups that should be able to
access and/or edit the PIN-Link you created.
Depending on which permissions you grant the users (Edit or Read Only permissions), they can either only see the PINs in the sidebar and view the detailed information in the dialog OR also edit or delete them.
Independent of permissions, the users can forward the PIN to other users.
Click the "Share" button in the top right corner of the dialog. The link is displayed in a pop-up.
You now have two options to share the link:
![]() – Send via e-mail. This automatically
opens your default e-mail program and pastes the link into
a new mail.
– Send via e-mail. This automatically
opens your default e-mail program and pastes the link into
a new mail.
![]() – Copy to Clipboard.
This copies the hyperlink and you can immediately paste it
somewhere.
– Copy to Clipboard.
This copies the hyperlink and you can immediately paste it
somewhere.
Prerequisites
The "Smart Views" product extension is deployed and configured correctly on your system. This product extension may incur additional licensing costs!
You are allowed to see the "Manage Smart Views" context menu entry for the selected node.
You can find instructions for deploying and configuring the "Smart Views" extension in the Customer Knowledge Base.
Any user with the permissions to create Smart Views on specific nodes can do it in the following way:
Navigate to a node where you have the appropriate permissions.
Right-click on the node to open the context menu.
Choose the context menu entry "Manage Smart Views". A dialog opens.
If there are no Smart Views configured on the node yet, the dialog only contains a prompt for you to configure a Smart View. To create one, click the "New" button in the lower section of the dialog sidebar.
If there are already Smart Views configured, they are
listed in the dialog sidebar.
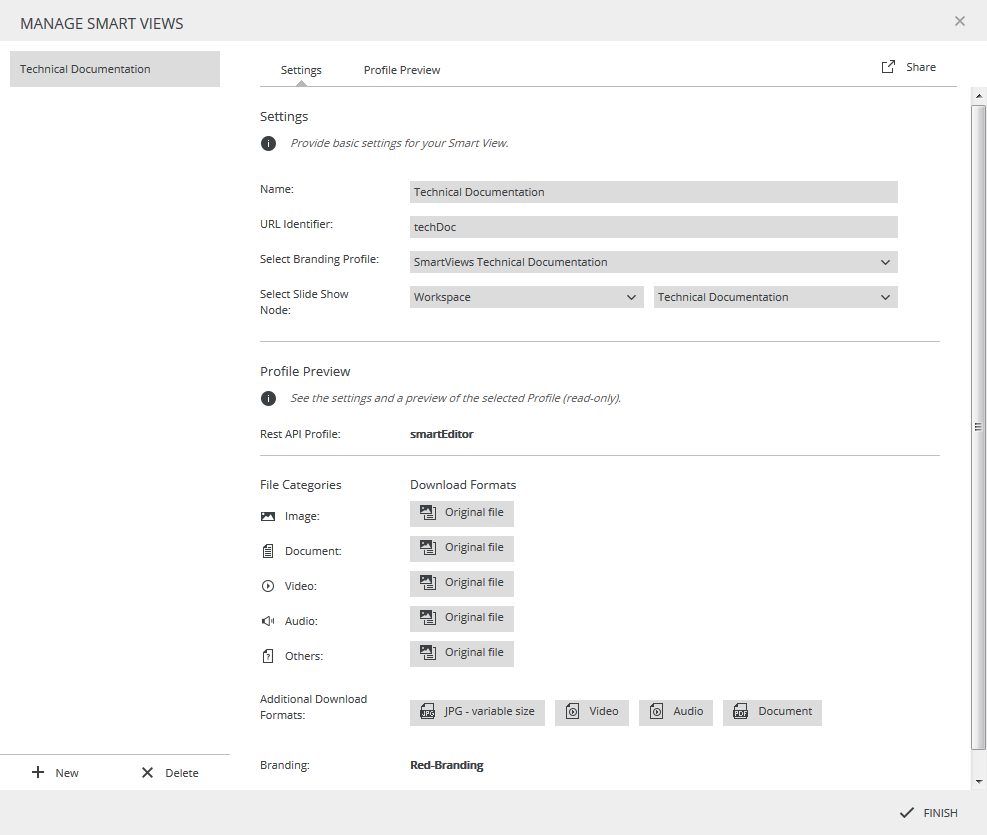
For a new or existing Smart View, you can enter or see the following information in the "Settings tab":
Name: By default, this is the node's name.
The Smart View name must be unique across the whole system, otherwise an error message will be shown on saving.
URL Identifier: A unique identifier which is part of the Smart View's URL.
Branding Profile: Choose one
of the Smart Views Profiles which were configured in the Configuration
Management.
Check "View"-permissions for recipients
To avoid accessibility problems with your Smart View, please check with the person who created the Smart Views Branding Profile if the user that was specified in the used API Authentication Profile also has "View"-permissions for the node on which you are creating the Smart View.
If the user specified in the API Authentication Profile doesn't have "View"-permissions for that node, nobody will be able to view the Smart View's URL, because the REST API user's permissions determine whether the Smart View on a particular node is visible.
Slide Show Node: Select a
node whose assets are displayed in a slideshow during downloads
from the Smart View.
It is highly recommended to restrict the number of assets inside the slide show node to 10 to avoid problems during slideshow execution.
If there are more than 10 assets inside the chosen slide show node, it is not defined which of the images will be shown in the slideshow.
Content: Click on the link to see the content of the node shared via the Smart View.
Based on the chosen Branding Profile, the "Profile Preview" section is updated and shows a read-only preview of the Smart Views Profile configuration.
Save the Smart View via "Finish". This closes the dialog.
You can either share a Smart View before you save the "Manage
Smart Views" dialog, or afterwards when you reopen the dialog.
The "Share" button  is located in the top right corner of the dialog.
Click on the button and copy the link to the Smart View.
Share the link with external people.
The external people can access the link and browse, view and download the assets contained in the node.
