Before you can start using the CELUM Drive desktop app, consult this topic on how to install it.
The CELUM Drive desktop app is a pure desktop application, which you can use on the following operating systems:
Windows® 10
macOS® X (the latest two releases)
The CELUM Drive desktop app will most likely be downloaded and rolled out in bulk by your organisation's system administrator, but if you want to download and install it manually, follow these steps.
Open the CELUM Work browser application and log in.
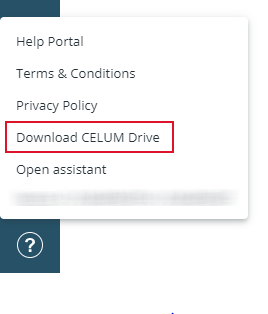
Once logged in, open the help menu in the system bar:

Click "Download CELUM Drive". A confirmation dialog opens.
Confirm the dialog by clicking "Download". The download starts automatically.
If you are an administrator for your local computer and want to install CELUM Drive desktop app with its full functionality, then you can use the downloaded .exe installation file for this. The .exe installer installs the complete functionality, including context menu and icon overlays, which need administrator permissions.
With the .exe installer, CELUM Drive desktop app is installed in your computer's Program Files directory (e.g. C:\Program Files\CELUM Drive), which also needs administrator permissions.
Execute the CELUM Drive installer (named CELUM Drive <version>.exe)
The installation wizard leads you through the installation process.
Please leave the CELUM Drive desktop app
running in order for synchronisation to work. You can minimize or
close the application window if you don't need it - the application
keeps running in the background and can be accessed via the system
tray: ![]()
If you have no administrator rights on your local computer and want to install the CELUM Drive desktop app, you can still do so with a .msi installation file. However, this installer does not install functionality that requires administrator permissions, like context menu and icon overlays.
Please contact a CELUM representative if you would like to use the .msi installer for the CELUM Drive desktop app.
With the .msi installer, the CELUM Drive desktop app is installed in your local user's directory (e.g. C:\Users\<Your local user>\AppData\Local\Programs\celum-drive\ ), which does not need administrator rights.
CELUM will provide the .msi installer for you upon request.
Execute the CELUM Drive installer (named CELUM Drive<version>.msi ).
The installation wizard leads you through the installation process.
To have the icon overlays and context menu functionality for the Windows® Explorer installed, contact your system administrator. The instructions are included below.
Please leave the CELUM Drive desktop app
running in order for synchronisation to work. You can minimize or
close the application window if you don't need it - the application
keeps running in the background and can be accessed via the system
tray: ![]()
As the system administrator for your company, you can roll out the additional functionality to all users of your company who have CELUM Drive desktop app installed on their local computers:
Download the "drive-plugins-win-release-1.x.zip" ZIP archive from hub.celum.cloud.
Extract the ZIP archive to a non-temporary location. The package contains the two handler files for the Explorer functionality:
CelumIconOverlays.dll
ContextMenu.dll
The other files in the archive are dependencies required by the handler assemblies.
Open a command line (cmd.exe) as Administrator.
Execute AsmReg.exe to register and install the file icon overlay handler:
C:\Windows\Microsoft.NET\Framework64\<version>\RegAsm.exe /codebase <shellExtDir>\CelumIconOverlays.DLL
Replace the placeholders in the command with actual values
Replace the <shellExtDir> placeholder in the command with the actual path to the extracted ZIP archive.
Replace the <version> placeholder in the command with the actual latest version of your Microsoft.NET framework.
Execute AsmReg.exe to register and install the context menu
handler:
C:\Windows\Microsoft.NET\Framework64\<version>\RegAsm.exe /codebase <shellExtDir>\ContextMenu.DLL
Replace the placeholders in the command with actual values
Replace the <shellExtDir> placeholder in the command with the actual path to the extracted ZIP archive.
Replace the <version> placeholder in the command with the actual latest version of your Microsoft.NET framework.
After the registration, restart Windows® Explorer (explorer.exe). Afterwards, users should see the icon overlays and CELUM Drive context menu entries.
Active handlers are limited
Windows® can only have 15 active handlers at the same time. If there are more than 15 registered and active handlers, only the first 15 handlers will be observed in alphabetical order.
If the CELUM icon overlays and context menu entries are not shown in Windows® Explorer, please contact CELUM support so a solution can be found.
Execute the CELUM Drive desktop app application (named CELUM Drive <version>.dmg).
A popup window displays the CELUM Drive .app file and also allows you to jump to the Application folder in Finder®.
Drag and drop the App file to the /Application folder.
Start the application manually from the /Application folder.
Please leave the CELUM Drive desktop app
running in order for synchronisation to work. You can minimize
or close the application window if you don't need it - the application
keeps running in the background and can be accessed via the Finder's
menu bar: ![]()
Once the CELUM Drive desktop app is installed, the CELUM location directory "CELUM Drive" will automatically be pinned to Quick access on Windows® or added to favorites on macOS®.